
Tutorial - Sequential Bayesian Learning - Linear Regression
While I was tutoring some of my friends on the fundamentals of machine learning, I came across a particular topic in Christopher M. Bishop’s “Pattern Recognition and Machine Learning”. In Chapter 3, the author gives a great, hands-on example of Bayesian Linear Regression. I have noticed that many students (including yours truly back in the days) struggle with in-depth understanding of this particular example of sequential Bayesian learning. I think it is one of the most eye-opening moments in the ML course to fully grasp what happens in that framework. I have learned that coding this particular example really helps with understanding the concept. This is why I have decided to present my approach on that particular challenge.
This example requires from the reader some basic machine learning knowledge, such as understanding of Bayes’ theorem (here I can recommend a very recent, excellent video by 3brown1blue), fundamentals of probability distribution or linear models. Once I have finished this blog post I have consulted my solution with a similar notebook. While I personally think that my code is more elegant, one can refer to this work for more detailed theory.
Sequential Bayesian Linear Regression Tutorial
The Goal of the Tutorial
In our task, there is some function. We know, that this function is linear. Additionally, the function is also noisy. We may assume additive, Gaussian noise. Our goal is create a parametrized model
\[t = y(\mathbf{x}, \mathbf{w}) + \epsilon\] \[y(\mathbf{x}, \mathbf{w}) = w_0 + w_1x\]and find its parameter distribution \(\mathbf{w}\). This can be done by sequentially collecting samples \(\mathcal{D}\) from the target function and using this data in the Bayesian framework to approach the true value of parameters.
However, finding the parameter distribution is merely an intermediate goal. Once we have established the distribution of coefficients through Bayesian treatment, we are able to predict \(t\) for every new input \(\mathbf{x}\)
\[p(t|\mathbf{x}, \mathcal{D}) = \int p(t|\mathbf{x},\mathbf{w})p(\mathbf{w}|\mathcal{D})d\mathbf{w}\]where \(\mathcal{D}\) denotes the data observed by the algorithm.
The key of Bayesian treatment is the ability to assign this probability to each value of \(t\) for a given \(\mathbf{x}\). Obviously, this is much more powerful than the solution based on maximizing the likelihood function. This is due to the fact that we obtain that precious probability distribution over parameters and not only point estimates. Additionally, the Bayesian approach does not suffer from over-fitting problem, nor it requires model complexity tuning (common problems with point estimates).
Coming back to the model. We can write it down as a Gaussian distribution, with the mean \(y(\mathbf{x}, \mathbf{w})\) and variance governed by a precision parameter \(\beta\). This last parameter quantifies the noise of the model.
\[p(t|\mathbf{x}, \mathbf{w}) = \mathcal{N}(t| y(\mathbf{x}, \mathbf{w}), \beta^{-1})\]Prior, Likelihood and Posterior
To treat linear regression in a Bayesian framework, we need to define three key elements of the Bayes’ theorem: prior, likelihood and the posterior.
Likelihood
Consider a data set of inputs \(\mathbf{X} = \{\mathbf{x}_1,\mathbf{x}_2,...,\mathbf{x}_N\}\), with corresponding target values \(\mathbf{T} = \{t_1,t_2,...,t_N\}\). Making the assumption that these data points are i.i.d (independent, identically distributed), we obtain the following expression for the likelihood function (which answers the question: how well function of parameters \(\mathbf{w}\) explain data \(\mathcal{D} = (\mathbf{X}, \mathbf{T})\)):
\[p(\mathcal{D}|\mathbf{w})=\prod^{N}_{n=1}\mathcal{N}(t_n|\mathbf{w}^T\phi(\mathbf{x}_n), \beta^{-1})\]Prior
Our intermediate goal is to find parameter distribution \(\mathbf{w}\), which is going to be as close as possible to the target coefficients \(a_0\) and \(a_1\). Initially, we know very little about the distribution. However, we may assume a conjugate prior to the likelihood function. Thus, in general the prior, will be also a Gaussian distribution.
\[p(\mathbf{w})=\mathcal{N}(\mathbf{w}|\mathbf{m}_{0},\mathbf{S}_0)\]Initially, we pick zero-mean isotropic Gaussian governed by a precision parameter \(\alpha\):
\[p(\mathbf{w})=\mathcal{N}(\mathbf{w}|\mathbf{0}, \alpha^{-1}\mathbf{I})\]Posterior
Finally we may compute the posterior, which is proportional to the product of the likelihood function and the prior.
\[p(\mathbf{w}|\mathcal{D})=\mathcal{N}(\mathbf{w}| \mathbf{m}_{N},\mathbf{S}_N) \propto p(\mathbf{T}|\mathbf{w}) p(\mathbf{w})\]It may be shown , that the mean and precision for the prior are
\[\mathbf{m}_N = \mathbf{S}_N(\mathbf{S}_0^{-1}\mathbf{m}_0 + \beta\mathbf{\Phi}^T\mathbf{T})\] \[\mathbf{S}^{-1}_N = \mathbf{S}_{0}^{-1} + \beta\mathbf{\Phi}^T\mathbf{\Phi}\]where \(\mathbf{\Phi}\) is a design matrix computed from the input data \(\mathbf{X}\).
Worked example
Experimental Setup
The constructor shows the experimental setup. We define precision parameters \(\alpha=2\) and \(\beta=25\), as well as the coefficients of the “unknown”, target, linear function:
\[y(\mathbf{x}) = a_0+a_1x = -0.3 + 0.5x\]Finally, the prior distribution is being computed. For all the probability-related things I recommend tensorflow probability library.
    def __init__(self):
        """
        In the constructor we define our prior - zero-mean isotropic Gaussian governed by single
        precision parameter alpha = 2; N(w|0, alpha**(-1)*I)
        """
        self.a_0 = -0.3         # First parameter of the linear function.
        self.a_1 = 0.5          # Second parameter of the linear function.
        self.alpha = 2          # Precision of the prior.
        self.beta = 25          # Precision of the noise.
        self.iteration = 0      # Hold information about the current iteration.

        self.prior_mean = [0, 0]
        self.prior_cov = 1/self.alpha * np.eye(2)
        self.prior_distribution = tfd.MultivariateNormalFullCovariance(loc=self.prior_mean, covariance_matrix=self.prior_cov)
Linear Function
Linear function method is used to generate synthetic data from the “unknown”, target function.
    def linear_function(self, X, noisy=True):
        """
        Target, linear function y(x,a_0,a_1) = a_0 + a_1 * x.
        By default, generated samples are also affected by Gaussian noise modeled by parameter beta.

        :param X: tf.Tensor of shape (N,), dtype=float32. Those are inputs to the linear function.
        :param noisy: boolean. Decides whether we should compute noisy or noise-free output.
        :return: tf.Tensor of shape=(N,), dtype=float32. Those are outputs from the linear function.
        """
        if noisy:
            noise_distribution = tfd.Normal(loc=0, scale=1 / np.sqrt(self.beta))
            return self.a_0 + self.a_1 * X + tf.cast(noise_distribution.sample(len(X)), tf.float32)
        else:
            return self.a_0 + self.a_1 * X
Calculating a Design Matrix
A design matrix is a matrix containing data about multiple characteristics of several individuals or objects. It is \(N\times M\) matrix, where rows are equal to the number of samples and columns to the number of features. In our particular example, the design matrix will have two columns and a variable number of rows. The first column corresponds to the \(w_0\) parameters and is a vector of ones. The second column corresponds to the \(w_1\) and contains vector \([\phi_1(\mathbf{x}_1), \phi_1(\mathbf{x}_2), ..., \phi_1(\mathbf{x}_N)]^T\). Since we do not use any basis function, this simply boils down to \([\mathbf{x}_1, \mathbf{x}_2, ..., \mathbf{x}_N]^T\).
    def get_design_matrix(self, X):
        """
        Computes the design matrix of size (NxM) for feature vector X.
        Here particularly, the function simply adds the phi_0 dummy basis (equal to 1 for all elements).
        :param X: tf.Tensor of shape (N,), dtype=float32. Those are inputs to the linear function.
        :return: NxM design matrix.
        """
        N = len(X)
        M = len(self.prior_mean)
        design_mtx = np.ones((N, M))
        design_mtx[:, 1] = X
        return design_mtx
Learning Step
This method performs the update step for the sequential learning. Once the posterior is computed, it becomes the prior for the next iteration (hence, sequential Bayesian learning!)
    def update_prior(self, X, T):
        """
        Single learning iteration, where we use Bayes' Theorem to calculate the new posterior over model's parameters.
        Finally, the computed posterior becomes the new prior.
        :param X: tf.Tensor of shape (N,), dtype=float32. Feature vector.
        :param T: tf.Tensor of shape=(N,), dtype=float32. Regression target.
        """
        design_mtx = self.get_design_matrix(X)

        self.posterior_cov = np.linalg.inv(np.linalg.inv(self.prior_cov) + self.beta * design_mtx.T.dot(design_mtx))
        self.posterior_mean = self.posterior_cov.dot(np.linalg.inv(self.prior_cov).dot(self.prior_mean)+ self.beta *design_mtx.T.dot(T))
        self.posterior_distribution = tfd.MultivariateNormalFullCovariance(loc=self.posterior_mean, covariance_matrix=self.prior_cov)
        self.prior_mean = self.posterior_mean
        self.prior_cov = self.posterior_cov
        self.prior_distribution = self.posterior_distribution

        self.iteration += 1
Plotting the Prior/Posterior
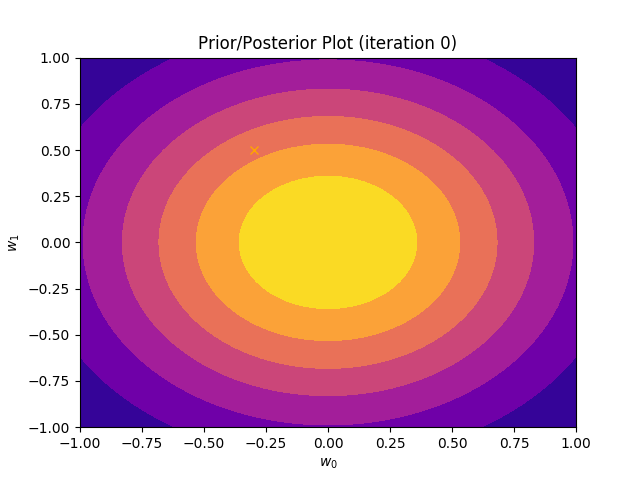
This method plots a prior/posterior distribution in every iteration. Additionally, we mark the point \((a_0, a_1)\) to see how quickly the posterior converges to our solution.
    def plot_prior(self):
        """
        Plot prior (posterior) distribution in parameter space. Also include the point, which indicates target parameters.
        """
        x = np.linspace(-1, 1, 100)
        y = np.linspace(-1, 1, 100)
        w_0, w_1 = np.meshgrid(x, y)

        z = self.prior_distribution.prob(np.dstack((w_0, w_1)))

        plt.contourf(x, y, z, cmap='plasma')
        plt.plot(self.a_0, self.a_1, marker = 'x', c = 'orange')
        plt.title("Prior/Posterior Plot (iteration {})".format(self.iteration))
        plt.xlabel("$w_0$")
        plt.ylabel("$w_1$")
        ax = plt.axes()
        ax.set_xlim(-1, 1)
        ax.set_ylim(-1, 1)
        plt.savefig('Prior_Posterior-{}.png'.format(self.iteration))
        plt.clf()
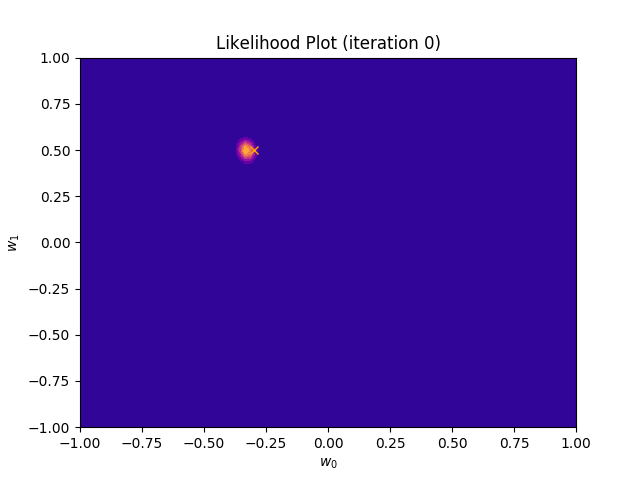
Plotting the Likelihood
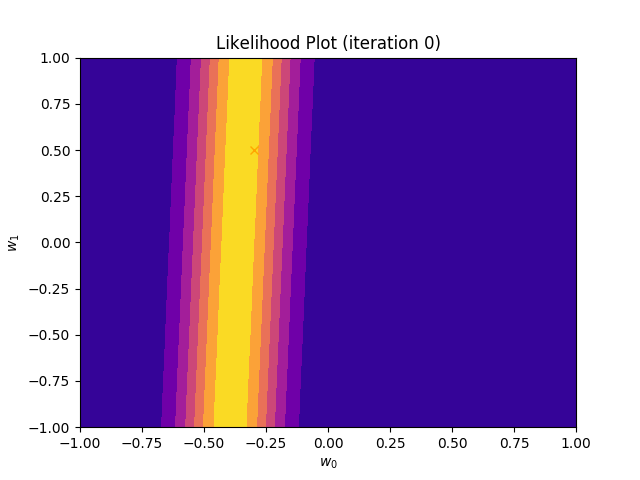
By analogy, we can also visualize the likelihood distribution. This answers the question: for the given batch of data, which parameters would best explain this data? I have already presented the likelihood equation. We can use it to compute log likelihood:
\[\ln p(\mathcal{D}|\mathbf{w})= \frac{N}{2}\ln\beta - \frac{N}{2}\ln(2\pi) - \frac{\beta}{2}\sum^N_{n=1}\{t_n-\mathbf{w}^T\phi(\mathbf{x}_n)\}^2\]Since only the last term depends on the parameters \(\mathbf{w}\), we might write:
\[p(\mathcal{D}|\mathbf{w})\propto \exp(-\sum^N_{n=1}\{t_n-\mathbf{w}^T\phi(\mathbf{x}_n)\}^2)\]And use this equation to finally compute the likelihood distribution.
    def plot_likelihood(self, X, T):
        """
        Plot likelihood distribution in parameter space. Also include the point, which indicates target parameters.
        :param X: tf.Tensor of shape (N,), dtype=float32. Feature vector.
        :param T: tf.Tensor of shape=(N,), dtype=float32. Regression target.
        """

        x = np.linspace(-1, 1, 100)
        y = np.linspace(-1, 1, 100)
        w_0, w_1 = np.meshgrid(x, y)

        least_squares_sum = 0
        for point, target in zip(X, T):
            least_squares_sum += (target - (w_0 + w_1 * point))**2
        z = np.exp(-self.beta*least_squares_sum)

        plt.contourf(x, y, z, cmap='plasma')
        plt.plot(self.a_0, self.a_1, marker='x', c='orange')
        plt.title("Likelihood Plot (iteration {})".format(self.iteration))
        plt.xlabel("$w_0$")
        plt.ylabel("$w_1$")
        ax = plt.axes()
        ax.set_xlim(-1, 1)
        ax.set_ylim(-1, 1)
        plt.savefig('Likelihood-{}.png'.format(self.iteration))
        plt.clf()
Predictive Distribution
Finally, the goal of the Bayesian framework, estimating the uncertainty of the prediction! Recall the formula for predictive distribution:
\[p(t|\mathbf{x}, \mathcal{D}) = \int p(t|\mathbf{x},\mathbf{w})p(\mathbf{w}|\mathcal{D})d\mathbf{w}\]This result is an integral of two terms: the model
\[p(t|\mathbf{x},\mathbf{w})\]which uses a particular set of parameter values, and a posterior, the probability for these parameter values
\[p(\mathbf{w}|\mathcal{D})\]This means, that the predictive distribution considers every possible parameter value. It evaluates the model that has those parameter values and then weights that result by the probability of having those parameter values in the first place.
Both model and the posterior are Gaussians. We can easily obtain the predictive distribution by, once again, convoluting two Gaussians:
\[p(t|\mathbf{x}, \mathcal{D})=\mathcal{N}(t|\mu, \sigma^2))\] \[\mu = \mathbf{m}_N^T\phi(\mathbf{x})\] \[\sigma^2 = \beta^{-1} + \phi(\mathbf{x})^T\mathbf{S}_N\phi(\mathbf{x})\]We can use this information to compute mean of the corresponding Gaussian predictive distribution, as well as the standard deviation.
    def prediction_mean_std(self, X):
        """
        For every sample compute mean of the corresponding Gaussian predictive distribution,
        as well as the standard deviation.
        :param X: tf.Tensor of shape (N,), dtype=float32. Feature vector.
        :return: list of tuples, where every tuple contains floats (mean, std)
        """
        no_samples = len(X)
        design_mtx = self.get_design_matrix(X)
        prediction = []
        for index in range(no_samples):
            x = design_mtx[index, :]
            predictive_std = np.sqrt(1/self.beta + x.T.dot(self.prior_cov.dot(x)))
            predictive_mean = np.array(self.prior_mean).dot(x)
            prediction.append((predictive_mean, predictive_std))
        return prediction
Data Space Plotting Method
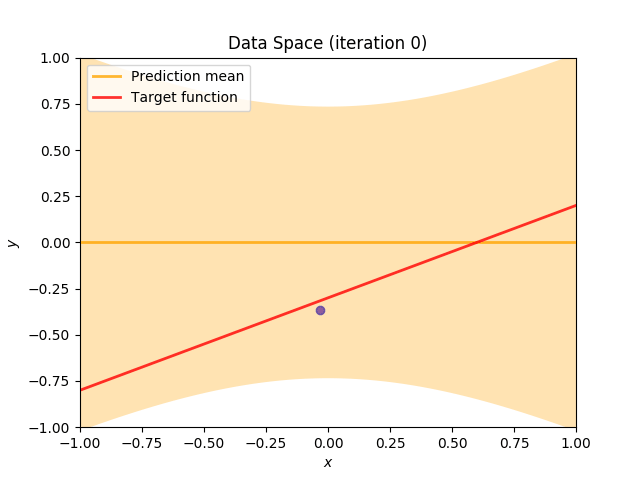
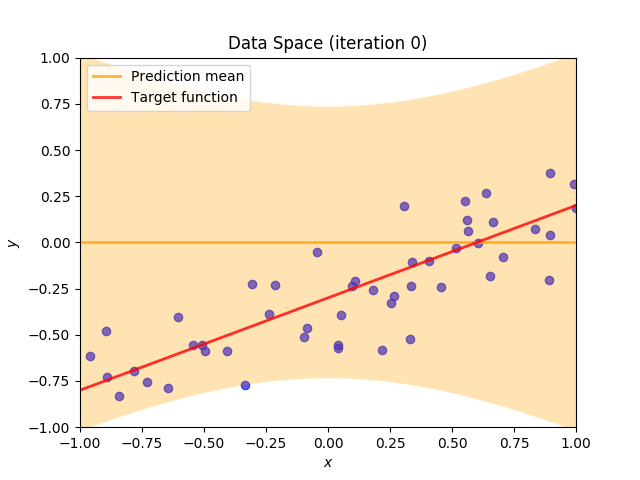
Finally, we construct a method which plots the batch of upcoming data (blue points), confidence region of predictive distribution spanning one standard deviation either side of the mean (shaded, orange area), prediction mean (orange line) and target function (red line).
    def plot_data_space(self, X, T, stdevs = 1):
        """
        Plot sampled datapoints, confidence bounds, mean prediction and target function on one graph.
        :param X: tf.Tensor of shape (N,), dtype=float32. Feature vector.
        :param T: tf.Tensor of shape=(N,), dtype=float32. Regression target.
        :param stdevs: int, how large should our confidence bound be in terms of standard deviation
        """

        x = np.linspace(-1, 1, 100)
        predictions = self.prediction_mean_std(x)
        prediction_means = [x[0] for x in predictions]
        y_upper = [x[0] + stdevs * x[1] for x in predictions]
        y_lower = [x[0] - stdevs * x[1] for x in predictions]

        plt.title('Data Space (iteration {})'.format(self.iteration))
        plt.xlabel('$x$')
        plt.ylabel('$y$')
        ax = plt.axes()
        ax.set_xlim(-1, 1)
        ax.set_ylim(-1, 1)
        # plot generated data points
        for point, target in zip(X, T):
            plt.scatter(x=point.numpy(), y=target.numpy(), marker ='o', c='blue', alpha=0.7)
        # plot confidence bounds
        plt.fill_between(x, y_upper, y_lower, where=y_upper >= y_lower, facecolor='orange', alpha=0.3)
        # plot prediction mean
        plt.plot(x, prediction_means, '-r', label='Prediction mean', c='orange', linewidth=2.0, alpha=0.8)
        # plot real function
        plt.plot(x, self.linear_function(x, noisy = False), '-r', label='Target function', c='red', linewidth=2.0, alpha=0.8)
        plt.legend(loc='upper left')
        plt.savefig('Data_Space-{}.png'.format(self.iteration))
        plt.clf()
Main Code
Now, the procedure is straightforward. We start knowing nothing - the initial prior. We sample fixed number of samples \(X\) from uniform distribution, use those samples to obtain \(T\). Next, we use \((X,T)\) to visualize likelihood function and the current quality of the model in the data space. Additionally we plot the prior distribution in parameter space. Finally, we use the batch of data \((\mathbf{X}, \mathbf{Y})\) to perform the sequential Bayesian update.
def run_sequential_bayes():
    samples_in_batch = 1        # batch size
    no_iterations = 20          # no of learning sequences
    samples_precision = 1000    # decimal precision of a sample

    sequential_bayes = SequentialBayes()
    samples_generator = tfd.Uniform(low=-samples_precision, high=samples_precision)

    for i in range(no_iterations):
        X = samples_generator.sample(samples_in_batch) / samples_precision
        T = sequential_bayes.linear_function(X)

        sequential_bayes.plot_likelihood(X, T)
        sequential_bayes.plot_prior()
        sequential_bayes.plot_data_space(X, T)
        sequential_bayes.update_prior(X, T)
Experiments
I perform two experiments. Firstly, in every iteration I supply only one pair of input and target (samples_in_batch = 1). We can see that the posterior starts converging close to the goal coefficients around iteration 12. This is also reflected in the data space. That is when the predictive distribution mean is almost equal to the target function. Note, how confidence bounds tighten as we observe more samples. Interestingly, the likelihood function always resembles a “ray”. Why is that so? Since we compute it only for one single sample \((x_0, t_0)\), any pair \(w_0\), \(w_1\), which satisfies the equation \(t_0 = w_0 + w_1x_0\) is a good fit. This means, that the line, which describes those good fits can be rewritten as: \(w_0 = t_0 - w_1x_0\) And this is straight-line equation, responsible for the “ray” shape.
Now, let’s use larger batches of 50 input-target pairs (samples_in_batch = 50). The posterior converges to a good approximation much faster and the satisfying solution in data space emerges after 4 iterations. Note, that the likelihood is not “ray-shaped” anymore. This time the likelihood needs to take into the account not one but fifty points It is not surprise that the distribution of “good fit” parameters is much more narrow.

Full Code
The full code can be found here.